
TOP > ゼロから始めるLinuxサーバ構築 > WebサーバへのSSL実装
最終更新日 : Saturday, 06-May-2006 00:10:42 JST
通常Webサーバとクライアント(ブラウザ)との通信は,暗号化されずに行われます。しかし,それではパスワードのやりとりなど第三者に見られてはいけない通信を行うことが出来ません。
そこで開発されたのがSSLという技術です。SSLサーバが発行する公開鍵を用いクライアント側で暗号化して共通鍵を発行しWebサーバの秘密鍵で復号します。そしてその共通鍵で通信を行うことによって暗号化を実現しています。
また,サーバが本当にアクセスしようとするドメインのサーバであるのか認証する機能を持っています。日本ベリサインに代表される認証局などから発行される証明書をWebサーバに置いておくことによって,DNSサーバの改ざんなどによってドメインが偽装されても偽装を検知することが出来ます。
認証局にサーバを認証してもらうには認証局との契約をしなければなりませんが,結構なお金がかかるためここでは自己認証という形で設定していきます。(もちろん,この方法ではドメインの正当性の補償はありません)当サーバでは,ウェブ上でのメールチェックなどで導入しています。
1.まず,鍵を作成します。Fedora4ではssl.keyディレクトリがないので作成します。
# mkdir /etc/httpd/conf/ssl.key/
# cd /etc/httpd/conf/ssl.key/
# openssl genrsa -des3 1024 > server.key

Generating RSA private key, 1024 bit long modulus
........++++++
.........................................................................................................++++++

e is 65537 (0x10001)

Enter pass phrase:*****

Verifying - Enter pass phrase:*****
このままではApache起動時にパスワードを求められるので,パスワードを無効にします。
# openssl rsa -in server.key -out server.key
Enter pass phrase for server.key:*****
writing RSA key
2.作成した鍵をrootしか読めない様にします。
# chmod 400 /etc/httpd/conf/ssl.key/server.key
3.自己証明書リクエストの作成
ここで,
Common Name (eg, your name or your server's hostname) []:
ここにはサーバのFQDNを確実に入力してください。
# cd /etc/httpd/conf/ssl.key
# openssl req -new -key server.key -out server.csr
You are about to be asked to enter information that will be incorporated
into your certificate request.
What you are about to enter is what is called a Distinguished Name or a DN.
There are quite a few fields but you can leave some blank
For some fields there will be a default value,
If you enter '.', the field will be left blank.
-----
Country Name (2 letter code) [GB]:JP
State or Province Name (full name) [Berkshire]:Kei
Locality Name (eg, city) [Newbury]:Komaki
Organization Name (eg, company) [My Company Ltd]:Kawa^H
[root@localhost ssl.key]# openssl req -new -key server.key -out server.csr
You are about to be asked to enter information that will be incorporated
into your certificate request.
What you are about to enter is what is called a Distinguished Name or a DN.
There are quite a few fields but you can leave some blank
For some fields there will be a default value,
If you enter '.', the field will be left blank.
-----
Country Name (2 letter code) [GB]:JP
State or Province Name (full name) [Berkshire]:Kei
Locality Name (eg, city) [Newbury]:komaki
Organization Name (eg, company) [My Company Ltd]:kei_company
Organizational Unit Name (eg, section) []:
Common Name (eg, your name or your server's hostname) []:keikun.homeip.net
Email Address []:kei@keikun.homeip.net

Please enter the following 'extra' attributes
to be sent with your certificate request
A challenge password []:
An optional company name []:
4.自己証明書の作成
# openssl x509 -in server.csr -out server.crt -req -signkey server.key
Signature ok
subject=/C=JP/ST=Kei/L=komaki/O=kei_company/CN=keikun.homeip.net/emailAddress=kei@keikun.homeip.net
Getting Private key
5.ssl.confの編集
# vi /etc/httpd/conf.d/ssl.conf
#SSLCertificateFile /etc/pki/tls/certs/localhost.crt ←コメントを付ける
SSLCertificateFile /etc/httpd/conf/ssl.key/server.crt ←新たに作成
#SSLCertificateKeyFile /etc/pki/tls/private/localhost.key ←コメントを付ける
SSLCertificateKeyFile /etc/httpd/conf/ssl.key/server.key ←新たに作成
DocumentRoot "/var/www/html" ←コメントを外しドキュメントルートを指定
6.Apacheの再起動
# /etc/init.d/httpd restart
httpd を停止中:                                            [  OK  ]
httpd を起動中:                                            [  OK  ]
7.動作確認
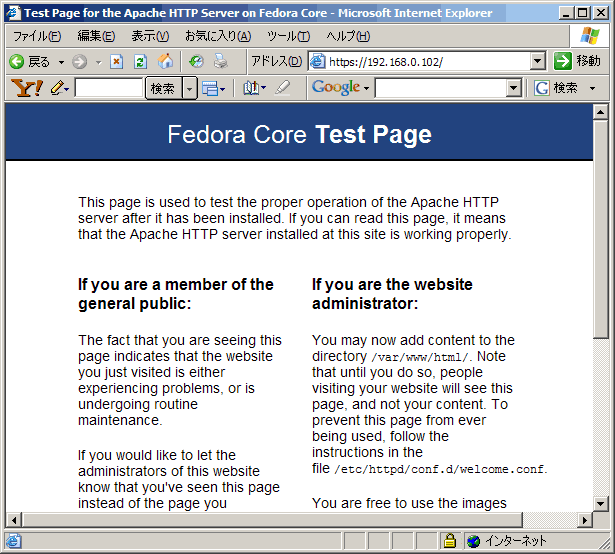
https://(サーバのIPアドレス) にアクセスをして,正常に閲覧できることを確認します。SSLで通信しているときはブラウザの下に鍵マークが表示されます。
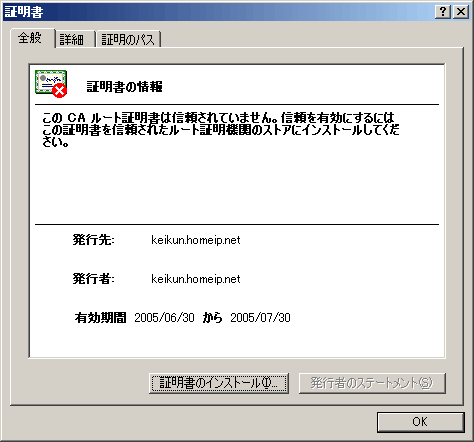
8.証明書の確認
鍵マークをダブルクリックすると証明書を確認することが出来ます。このように,事故証明した場合は発行者と発行先が同じになっており,認証局から認証されていないとの表示がなされます。
(c) 2000-2005 Kei All Rights Reserved.